A hammer or pry bar can be used to remove nails and damaged boards. Then the replacement board should be measured and cut to size before being screwed in place.

It’s important to check for rotting wood regularly. If you notice that an area feels soft or spongy, call Deck Repair Charleston SC professionals right away.
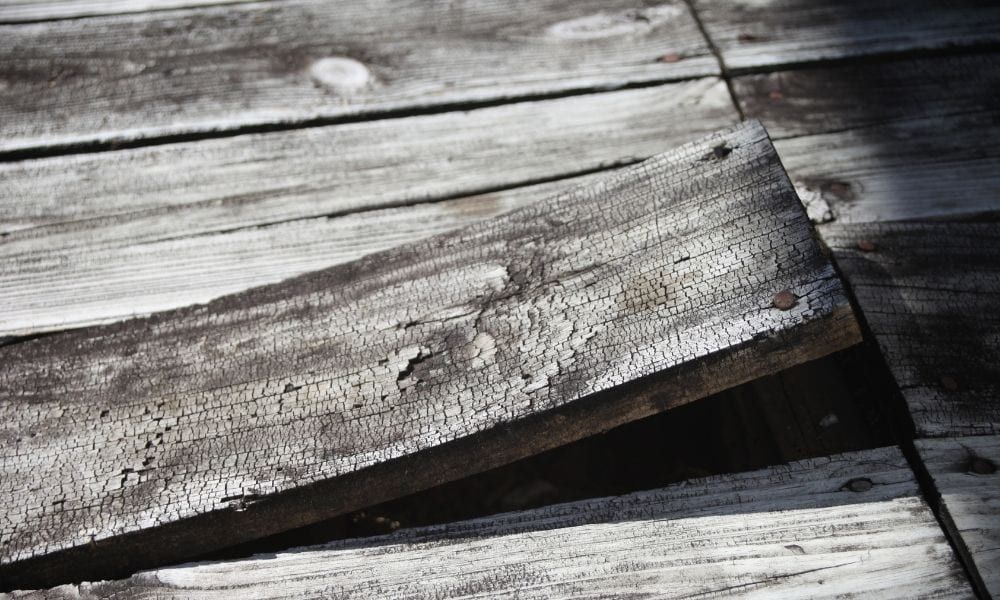
If you have soft or spongy spots on your deck, you may be dealing with rot. This is a common issue and should be addressed immediately to prevent the wood from breaking down.
Often, the problem is caused by water that soaks into the wood and creates a breeding ground for mildew or mold. If you catch it early, a simple cleaning and resealing will do the trick. However, if the damage has already occurred, you may need to replace the affected boards.
It is also possible that the rotted areas are caused by a loose ledger board, which is the piece of wood that attaches the deck to your house. If this is the case, it’s important to call a professional builder or home improvement specialist to ensure that the rest of your house’s framing is not compromised.
Loose deck posts are another common source of rot. This can be due to incorrect installation or a structural problem. A loose post can cause a serious problem and should be replaced immediately.
In addition to the epoxy, you will need a few other tools for this job: wood chisels and a hammer. These are used to remove any rotten areas of the deck. A drill machine with bits: These will be used to drill into the joist or decking board and make holes for screws or nails. Wood filler: This is used to fill the pits left by the rotted area. Once the wood filler dries, it can be sanded to make it smooth and even. Safety glasses: This is important to protect your eyes from the wood dust.
Once the rotted areas have been cleaned and filled, it is time to install the new boards. It’s a good idea to use treated lumber for this, as it will hold up better to the elements than untreated wood. You should also take the time to inspect your deck for any other issues that could contribute to rot, such as a leaky roof, poor gutter alignment, or a sprinkler system problem.
Cracked Planks
Over time, wood expands and shrinks slightly in response to moisture levels and temperature changes. This expansion and contraction puts stress on deck boards, which can lead to cracks. These cracks are unsightly and can also pose a safety risk, particularly for those who walk on the deck barefoot. Fortunately, it is fairly simple to repair cracked planks in a couple of different ways.
One option is to simply fill the crack. This can be done by using a putty knife to apply a layer of wood filler over the crack. This should be allowed to dry completely before walking on the board or cleaning it. A good-quality wood filler is stainable, so it will take on the color of the wood around it, making it easier to blend in and hide.
For larger cracks, you may want to consider replacing the board. This is not only a more permanent solution but can be more cost-effective as well, since the wood will need to be replaced anyway. To replace the board, carefully remove it from the deck with a hammer and prybar. Then, drill the new board into the joist with the same screw holes and use larger screws to avoid weakening the joist.
Alternatively, you can try splicing in a new piece of board to cover the existing one. This can be more difficult than just filling in the crack, but it can still be done with a bit of skill. To splice in a new piece of wood, first clean the area to be worked on with a cloth doused in mineral spirits. This will ensure that the new glue will adhere properly to the board. Next, tape over the edges of the board on both sides. This will catch any epoxy oozing out of the bottom and make cleanup much simpler.
If you prefer not to use splicing, you can always try using a penetrating epoxy instead. This type of epoxy will draw into the cracks, saturating and sealing all exposed wood fibers. This method is typically faster and more effective than just filling the cracks. Be sure to follow the manufacturer’s instructions for mixing and applying, and work in a well-ventilated area.
Broken Railings
Many porch decks feature railings that make stairs safer for people. The most basic railings consist of a handrail with hardware that secures it to the wall. But most have more elaborate balusters that run in vertical lines from the handrail to the base rail. When these are broken or missing, the safety of the staircase is compromised. The good news is that repairing wood railings is fairly simple.
The first step is assessing the damage and deciding what needs to be fixed. Sometimes it may be a case of replacing an entire railing, while other times it might be a matter of a few loose screws or even just replacing a single broken baluster.
Once the broken pieces have been removed, loosen and remove any nails that remain. Then you can start to work on securing the new ones in place. It is important that you use the right type of glue for this. Ordinary wood glue will not work; you will need something that dries into a hard, glassy substance that takes on the appearance of the original wood.
First, clean out any debris from the crack or split in the banister using a putty knife. Then dry fit the new piece; if it fits tightly, you can go ahead and glue it in place. If it doesn’t, carefully examine the break to see what is keeping it from closing up. It is likely that you will be able to pull out a few fibers that you can then chisel away.
Now, choose a replacement baluster of the same width and species of wood as the one that was broken. If the baluster is part of a larger section of the railing, cut a new board that is long enough to center on the next joist over and then nail it in place. Make sure that the new board is primed on all sides and then painted or stained (Furst uses a stain that penetrates the surface rather than just coating it) before securing it with wood glue. This will prevent the wood from absorbing moisture, which can cause it to split and crack again.
Damaged Posts
The wood posts that support the deck are prone to damage from both weather and normal use. If your posts become splintered or cracked, it is time to replace them. Fortunately, replacing deck posts is relatively simple. You can find new wood posts at a hardware store that match the color and type of your existing boards. Before you head out to buy replacements, take measurements of your existing posts and the width and height of your joists so that you know exactly what lengths and sizes to purchase for your new boards. It is always better to get a little longer than too short if you are unsure what size board you need.
Unlike rotting planks, which can be repaired simply by sanding and staining, damaged posts must be replaced. A professional should inspect your deck to ensure that the underlying support structure is intact before replacing any posts. Erosion is another major concern that can affect both wooden and concrete deck footings. Erosion can occur due to changes in the slope of your yard, drainage issues, and even landscaping changes. Erosion can loosen or break posts and cause the footings to sink. It is important to fix erosion problems before they cause major damage to a deck.
It is not uncommon for nails and screws to disappear over the years. While it may seem like a minor issue, missing screws can actually weaken stairs and railings and lead to structural problems. A professional should check the integrity of your deck to make sure that all necessary nails and screws are in place.
If your existing posts are set in concrete footings, you can repair them with EZ Mender post repair brackets. These are available at most home improvement stores. These are U-shaped jackets that fit around the base of a deck post. They have a sharp point on one end and a nailing lug on the other. They are installed by hammering in the end with a 3-pound sledge hammer. EZ Menders also come in galvanized steel, which protects against rust.